Table of Contents
When Should You Close Your Pool?
The timing for pool closure varies dramatically based on your geographic region and climate. Closing too early leaves your equipment sitting idle all winter; closing too late risks catastrophic freeze damage to pipes and equipment that can cost thousands to repair.
Regional Closing Timeline
Northeast & Upper Midwest
Closing window: September to October
States like New York, Pennsylvania, Michigan, and Minnesota see freezing temperatures by November. Begin closing by mid-September to late October. Temperatures consistently below 65°F signal it's time to winterize. Early action prevents costly freeze damage to plumbing that extends through foundation walls.
Southeast & Warm Climates
Closing window: November to December (or never)
Texas, Florida, Arizona, and California pools may close in late November or December, or stay open year-round. Only close if freezing nights occur. Many Southern pools operate 10-11 months per year, with light winterization if closing is needed at all.
Midwest Transition Zone
Closing window: October to November
Illinois, Ohio, and Wisconsin typically see first freezes in November. Plan to close by late October as a buffer against unexpected early cold snaps. This timing gives you safety margin if weather turns severe faster than forecast.
The Temperature Rule
The most reliable indicator is simple: Close your pool when your water temperature consistently stays below 65°F. At this point, algae growth stops, chlorine demand drops, and the risk of freeze damage becomes real. Below this temperature, you're entering true freeze season.
Pro Tip: Check your local 10-day forecast. If nighttime lows are consistently below 65°F, don't wait—close your pool this weekend. Unexpected early freezes can trap water in lines and cause thousands in damage to pumps, filters, and heaters.
Visual Guide: Pool Winterization
Watch this comprehensive video from Swim University to see the entire winterization process in action.
Video: How to Close (Winterize) an Inground Pool — Swim University
Complete Supplies Checklist
Before closing day, gather everything you'll need. Scrambling for supplies mid-process wastes time and increases the chance of mistakes. Proper preparation ensures a smooth, efficient winterization that protects your investment.
Pool Shock
2-3 bags depending on pool size
Double dose formula for winter protection
Stain Preventer
Metal sequestrant
Protects plaster from staining
Water Tubes
Air pillows for cover
Holds cover down against wind
Cables & Winch
Cover clips and cable kit
Secure cover perimeter
Air Compressor
5+ CFM minimum
Critical for blow-out process
Cost Estimate: A typical winterization kit costs $150-$350 depending on pool size and whether you need a new cover. This is significantly less than repairing freeze damage, which can cost $2,000-$10,000.
Check Your Readiness
Check everything you have or have done. Be honest — skipping steps causes expensive freeze damage.
The 7-Step Winterization Process
Balance Water Chemistry
The Foundation
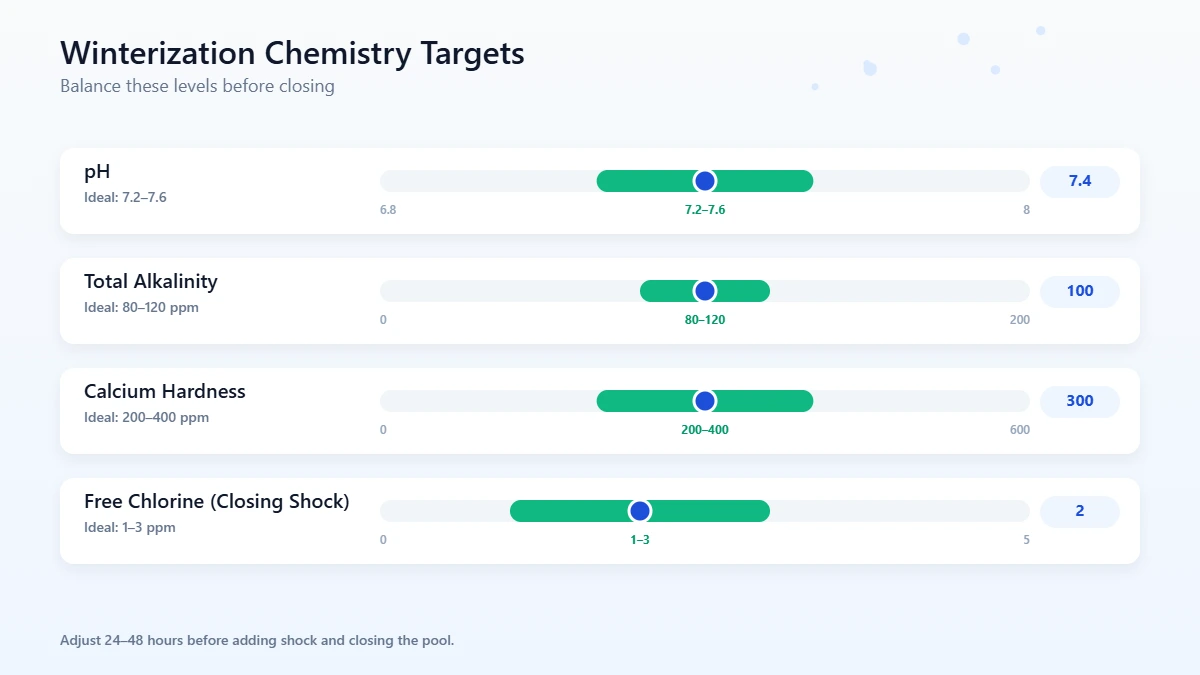
Before you shock the pool, you must establish a strong chemical foundation. Balanced water is less likely to corrode equipment or damage the pool structure over winter. Test all four parameters using a quality test kit. For detailed testing guidance, see our complete pool water testing guide.
Target pH between 7.2-7.6 to prevent metal corrosion and plaster etching. Alkalinity should be 80-120 ppm to stabilize pH and prevent chemical swings. Calcium hardness needs 200-400 ppm to avoid plaster deterioration and scaling. Finally, chlorine should be 1-3 ppm before shocking. Wait 2-4 hours after adjustments for circulation before moving to step 2. Proper chemistry now means less stress on pool surfaces and equipment during months of dormancy. Use our dosage calculator to determine exact chemical amounts for your pool size.
Deep Clean Your Pool
Remove Debris and Algae
Remove all debris, dirt, and algae before adding winter chemicals. A dirty pool wastes chemicals and increases staining risk. Brush walls and floor thoroughly using 45-degree strokes on plaster surfaces to remove algae spores and buildup with a quality pool brush. Vacuum the entire pool floor using the main drain if available to pull debris faster.
Clean the tile line with a brush and mild acid solution to remove buildup that promotes algae growth. Empty all skimmer baskets and check the pump basket for debris. Use a non-abrasive sponge to clean the waterline, and run circulation for 2-4 hours after brushing to send debris through the filter. A clean pool takes 20-40% less chemical and is significantly easier to maintain next spring.
Shock and Add Winter Chemicals
Create Your Winter Barrier
A strong chemical dose creates a protective barrier that lasts through winter. Add 2x the normal shock dose of cal-hypo shock (check instructions for your pool size). For example, if normal is 1 lb per 10,000 gallons, add 2 lbs per 10,000. This kills remaining algae spores and oxidizes organic matter. Use our shock calculator to determine exact dosages. Let it circulate overnight before adding the next chemical.
Twelve to twenty-four hours after shock, add winter algaecide (copper-free preferred) at label rates. Copper-based algaecides can stain pool surfaces (especially plaster) when left sitting in stagnant, uncirculated water for months. Always use a copper-free formula for winterization. Winter formula is designed for colder temperatures where regular algaecide may not work effectively. Then add stain and scale preventer at label rates to protect plaster from mineral staining and metal oxidation. Finally, consider enzyme treatment per label instructions—it breaks down organic buildup and helps spring opening go faster. Always follow this sequence: shock first, wait 24 hours, then algaecide, then stain preventer. Adding them simultaneously can cause chemical reactions.
Lower the Water Level
Prevent Ice Expansion Damage
Lowering water prevents ice from building up and pushing on equipment or pool walls. But how much you lower depends on your pool type. For concrete and plaster pools, drain water to 6 inches below the skimmer opening. This ensures the skimmer and return lines are above water level, preventing ice from freezing inside lines and causing cracking. For vinyl liner pools, lower water 4–6 inches below the skimmer opening, ensuring the liner remains fully supported by water. Lowering too far risks liner shrinkage and stress, especially in cold weather when vinyl becomes less flexible.
Install a Gizzmo or Skimmer Guard: After lowering the water level, install a Gizzmo or skimmer guard in each skimmer opening. This device absorbs ice expansion pressure inside the skimmer throat and prevents cracking — a repair that costs $500–$1,500. Thread it into the skimmer hole finger-tight.
Use a submersible pump for the fastest drainage, positioning it in the deep end and running discharge to an approved drain location. Our pool volume calculator helps determine how many gallons you'll be draining. Alternatively, use your main drain valve if the system has one, though this is slower. Never drain completely unless directed by a professional for major repairs—exposed pool walls are highly vulnerable to freeze-thaw damage.
Blow Out the Plumbing Lines
Most Critical Step
This is the most critical step. Water trapped in lines freezes and expands approximately 9%, cracking pipes and causing catastrophic damage: cracked pump casings ($500-$1,500), broken pipes ($2,000-$5,000), damaged filter tanks ($1,000-$3,000), and ruined heaters ($2,000-$8,000). Invest 30 minutes now to avoid $5,000+ in spring repairs. See our pool filter guide for more on protecting your equipment.
Turn off the pump completely and close the main drain valve to force air through suction lines. Open the skimmer line isolation valve. Connect an air compressor or shop vac to the line using a threaded blow-out adapter. Start at 20 PSI and gradually increase to 40-50 PSI, never exceeding 60 PSI to avoid blowing out gaskets. Listen for whooshing sounds and watch for water spray from return openings in the pool. Keep the compressor running 30-45 seconds after water stops flowing to ensure NO water remains in the line.
Immediately install an expansion plug while air is still flowing—do not wait, as water will trickle back in. Repeat for EACH suction and return line. Most pools have 2-4 return lines. After blowing out, drain the pump, filter, heater, and chlorinator completely. Finally, pour pool antifreeze (RV/pool grade, NOT automotive) down return lines after plugging for extra protection—typically 1-2 quarts per line per label instructions. Consult our equipment troubleshooter if you encounter issues during the blow-out.

Plumbing Winterization Too Complex?
Blowing out lines incorrectly can cause thousands in pipe damage. A pool pro has the right air compressor and knows every line.
Remove and Store Equipment
Protect from Weather and Freeze
Exposure to freezing temperatures and moisture damages pumps, filters, and electronics. Remove portable equipment like ladders, handrails, eyeball fittings, return covers, test probes, robotic cleaners, suction-side cleaners (Kreepy Krauly, etc.), and pressure-side cleaners (Polaris)—store them indoors. Drain all water from robotic cleaners and store indoors — freezing temperatures will destroy internal motors and components. Remove and drain large equipment: pump and motor should have the breaker turned off, drain plug opened, and plastic sheeting cover applied. Place all drain plugs inside the pump strainer basket so you can find them easily in spring — this classic pro tip saves many frantic searches. Filter tanks must be drained completely with the top open and covered with plywood or tarp.
If you have a pool heater, close isolation valves and open the drain plug. If removable, store it indoors. For salt systems, remove the salt cell and store indoors—warranty voids if left outside. Use a dry, temperature-controlled garage or shed for storage. Don't stack items as this causes warping. Label everything with photos of electrical connections before disconnecting to ensure easy reassembly. Hang hoses to dry completely before storing to prevent mold growth. Never store chemicals indoors as they react dangerously with moisture and temperature changes.
Install the Winter Cover
Final Protection
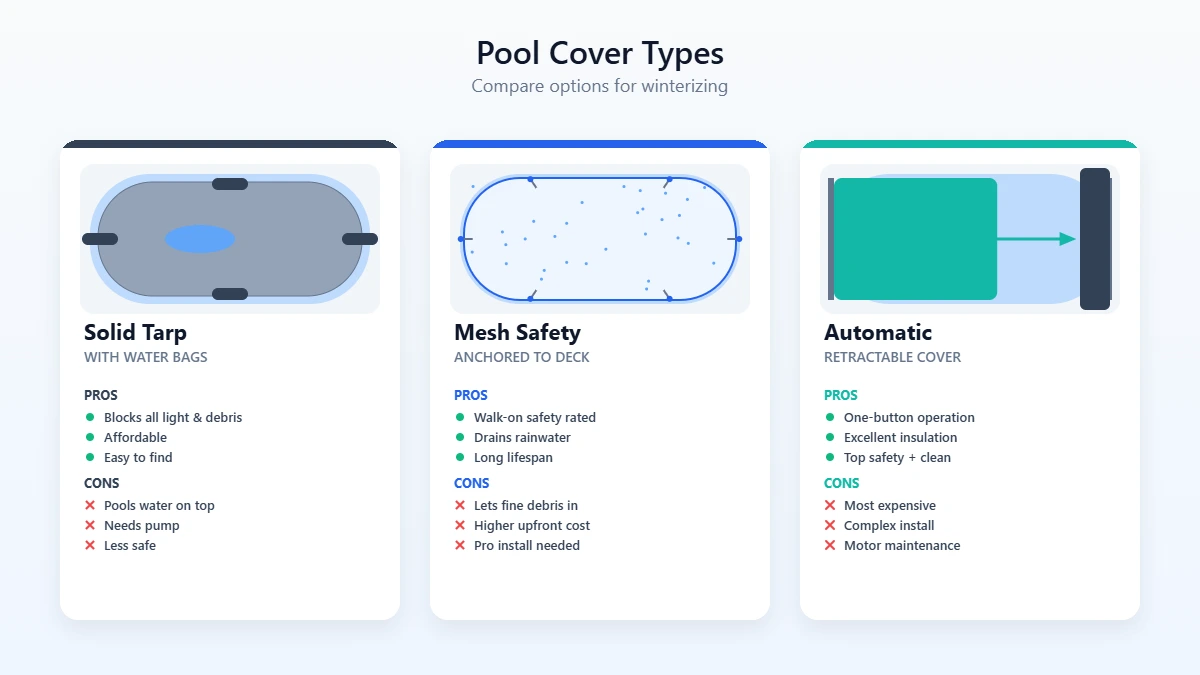
A proper cover protects water from debris, reduces evaporation, and keeps out light that feeds algae. A loose or damaged cover defeats the entire purpose. Clean the pool deck thoroughly first—any sharp objects, sticks, or dirt will puncture the cover. Position the cover at one end with the seam running lengthwise. Have a helper ready to assist as you unroll and center it slowly across the water. Use a cover roller or winch if available for even distribution.
Install water tubes or air pillows along the underside perimeter, spacing them every 3-4 feet to hold the cover against wind. Secure with cables and winch (or manual straps), tightening evenly around the perimeter. The cover should be snug but not overstressed. If using a solid cover, install a thermostat-activated cover pump to remove rain and snow water that collects on top—idle pumps can freeze and break. Check for gaps or sags. The cover should be tight and level, as sagging areas collect water and debris. During winter, remove heavy snow after storms (more than 12 inches puts dangerous stress on structure), keep the cover pump running, and check cable tension monthly as winter winds loosen them.
Inground vs Above Ground: Key Differences
While the core principles of winterization are the same, inground and above ground pools require different approaches for several critical steps. Getting this wrong can cause thousands in damage.
Inground Pools
Water Level: Lower 4-6 inches below the skimmer mouth. Never drain completely as hydrostatic pressure from groundwater can pop the pool out of the ground or crack the shell.
Plumbing: Must blow out all lines with an air compressor (30+ PSI, 5+ CFM). Inground pools have longer, more complex plumbing runs that trap water. Install expansion plugs in every return and the main drain.
Cover: Use a safety cover (mesh or solid) anchored to the deck with spring-loaded straps and brass anchors. Safety covers support the weight of a person or pet that walks onto them.
Equipment Pad: Drain the pump, filter, heater, chlorinator, and any booster pumps. Open all drain plugs. If equipment is permanently mounted, cover with weatherproof tarps.
Above Ground Pools
Water Level: Lower 4–6 inches below the skimmer opening. Above ground pools rely on water weight to support the walls, so never drain more than necessary.
Plumbing: Disconnect all hoses from the pump and filter. Drain hoses completely and store flat (not coiled, which traps water). Most above ground setups have short, simple plumbing that drains by gravity.
Cover: Use a standard winter cover with a cable and winch system around the top rail. Place an air pillow (ice compensator) in the center of the pool before covering. This absorbs ice expansion pressure and prevents the cover from sinking under rain and snow.
Equipment: Disconnect pump, filter, heater, and chlorinator completely. Bring them indoors or store in a dry garage. Remove all drain plugs and store them in the pump basket so you can find them in spring.
Universal Rule: Whether inground or above ground, the single most important step is clearing water from all plumbing lines. Trapped water freezes, expands 9%, and cracks pipes, fittings, and equipment. This is the #1 cause of expensive spring repair bills.
Common Winterization Mistakes
These mistakes are responsible for the vast majority of freeze damage and ugly spring openings. Each one is entirely preventable.
Not blowing out plumbing lines completely
Even a small amount of trapped water can crack a pipe, fitting, or pump housing. Blow air through every line until you see sustained bubbles in the pool for at least 30 seconds per line. Then plug immediately while air is still flowing.
Closing too late
Waiting until after the first hard freeze puts your equipment at immediate risk. Close when your water temperature drops below 65°F consistently. An unexpected early freeze while your pool is still open can cause catastrophic damage overnight.
Skipping the shock treatment
Closing without shocking means bacteria and algae have all winter to multiply in stagnant water. By spring, you could face a pool full of black water that takes weeks and hundreds of dollars in chemicals to recover. Always double-shock before covering.
Leaving the water level too high
If water sits at the skimmer level, ice expansion can crack the skimmer throat and tile line. Lower water below the returns (inground) or well below the skimmer (above ground) to give ice room to expand without contacting vulnerable components.
Not removing the filter drain plug
A filter tank full of water will crack when it freezes. Open all drain plugs on the pump, filter, heater, and chlorinator. Leave them open all winter. Place plugs in the pump basket so you can find them easily in spring.
Using a damaged or undersized cover
A cover with holes lets in sunlight (feeding algae), debris, and rain that dilutes your closing chemicals. Measure your pool and buy a cover that overlaps by at least 3 feet on each side. Replace any cover with tears or deteriorating straps.
Frequently Asked Questions
When should I close my pool for winter?
How much does it cost to winterize a pool?
Can I close my pool without an air compressor?
Should I drain my pool completely for winter?
Do I need to run my pump during winter?
Solid cover or mesh cover — which is better?
Not Confident About Blowing Out Lines?
Freeze Damage Can Cost Thousands — A Pro Closing is $150-$350.
The most expensive pool repairs come from improper winterization. Cracked pipes, blown heater cores, and split pump housings all happen when water is left in the plumbing. A local professional has the compressor and experience to do it right.
Related: Pool Cost Guide · Leak vs. Evaporation