Table of Contents
Opening your pool is one of the best feelings of spring. But if you get the opening sequence wrong, you risk murky water, equipment damage, and wasted chemicals. Follow this 8-step guide to do it right the first time.
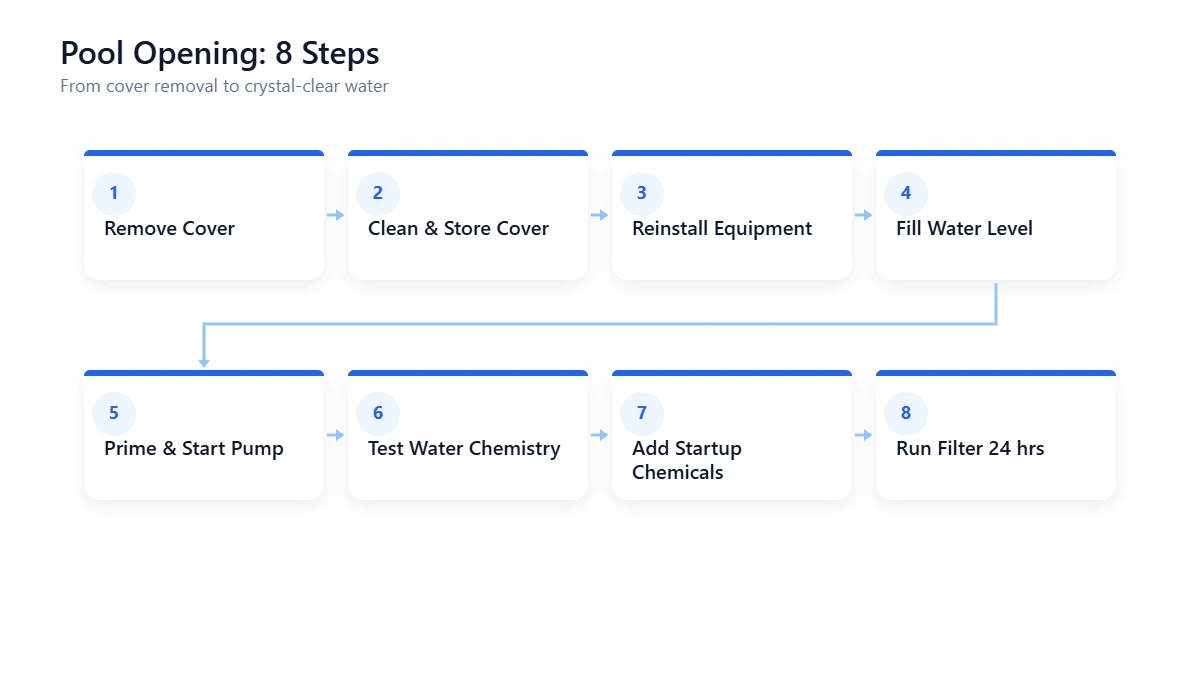
The 8-Step Opening Checklist
1. Remove and clean pool cover
2. Inspect pump, filter, heater
3. Reconnect equipment & prime pump
4. Skim, brush, and vacuum pool
5. Fill to mid-skimmer level
6. Test & balance chemistry
7. Add shock at night
8. Run pump 24/7 for 24 hours
When to Open Your Pool
The ideal time to open your pool depends heavily on your region and water temperature. Opening too early wastes chemicals on cold water that won't properly absorb them. Opening too late means missing prime swimming weather.
Regional Opening Timeline
Use this timeline as a starting point, but always check your actual water temperature. See our pool opening planner for a customized checklist based on your location:
- Southern Pools (FL, TX, CA, AZ): Mid-March to April. Ground and air temperatures warm faster, allowing earlier openings.
- Mid-Atlantic & Southeast (GA, SC, NC): Late April to early May. Wait for consistent 60°F+ water temperatures.
- Northeast (NY, PA, MA, CT, NJ): Mid-May to late May. Water temperatures stay cold well into spring.
- Midwest (OH, MI, IL, IN): Late May to early June. Freeze-thaw cycles still pose equipment risk until late May.
The Water Temperature Rule of Thumb
Open your pool when water temperature consistently reaches 60°F, or when daytime air temperatures hit 70°F for 2–3 consecutive days. Algae can begin growing at water temperatures as low as 50–60°F, so the earlier you open and establish chemistry, the less likely you are to battle a bloom. Pool chemicals dissolve and react effectively in cool water — there is no need to wait for warm temperatures to balance your chemistry. The real risk is waiting too long: algae spores begin germinating at 50–60°F, and an unopened pool is a breeding ground. Additionally, cold water stresses equipment during startup.
Temperature Check
You can and should open your pool as soon as water reaches 60°F. Adding chemicals in cooler water is perfectly effective and gets ahead of algae before it establishes.
Tools & Supplies You'll Need
Gathering everything beforehand saves time and prevents mid-opening supply runs. Here is the complete checklist:
Cleaning & Physical Tools
- Pool Brush (20-24 inches for walls, floor)
- Leaf Net or Skimmer Net
- Pool Vacuum (either manual or automatic)
- Pump Basket and Skimmer Baskets
- Hose (minimum 50 feet for refilling)
- Bucket or collection container
Chemicals (Opening Kit)
- Alkalinity Increaser (Sodium Bicarbonate) — 2-3 lbs typically
- pH Increaser or Decreaser (Soda Ash or Muriatic Acid)
- Calcium Chloride (Calcium Hardness builder) — 1-2 lbs
- Cyanuric Acid (Stabilizer) — 1-2 lbs for initial dose
- Pool Shock (Calcium Hypochlorite or Liquid Chlorine) — 2-4 lbs or gallons
- Chlorine (Tablets or Granular) — for maintenance
- Algaecide (Preventative, optional but recommended)
Testing Equipment
- Drop Test Kit (Taylor K-2006 recommended) — Most accurate method. See our complete water testing guide.
- OR Digital Tester (AquaChek or similar) — Faster but less precise
- Test strips as backup only — Never rely on these as primary testing
Step 1: Remove and Clean the Cover
Your pool cover has protected your water all winter, but it has also collected leaves, pollen, and algae growth. Improper removal can dump all of this debris into your pool.
Safe Cover Removal Process
Remove Standing Water
If your cover has pooled water or debris on top, use a submersible pump or wet-dry vacuum to remove it before pulling the cover. This prevents 100+ gallons of dirty water from flowing into your pool.
Carefully Lift and Roll
Roll the cover toward the deep end as you remove it, rather than dragging it across the pool deck. This minimizes leaf and debris transfer into the water. If using safety anchors or springs, remove them carefully.
Clean and Dry the Cover
Rinse the cover with your hose to remove large debris and algae growth. If it is heavily stained, use a mild brush with diluted bleach (1:10 ratio). Allow it to dry completely in the sun before storing it in a cool, dark location to prevent degradation.
Wet covers will develop mold in storage. Never fold it while wet.
Store Properly
Store the cover in a sealed container or heavy-duty bag, away from direct sunlight, temperature extremes, and rodents. A quality cover can last 5-7 years with proper care.
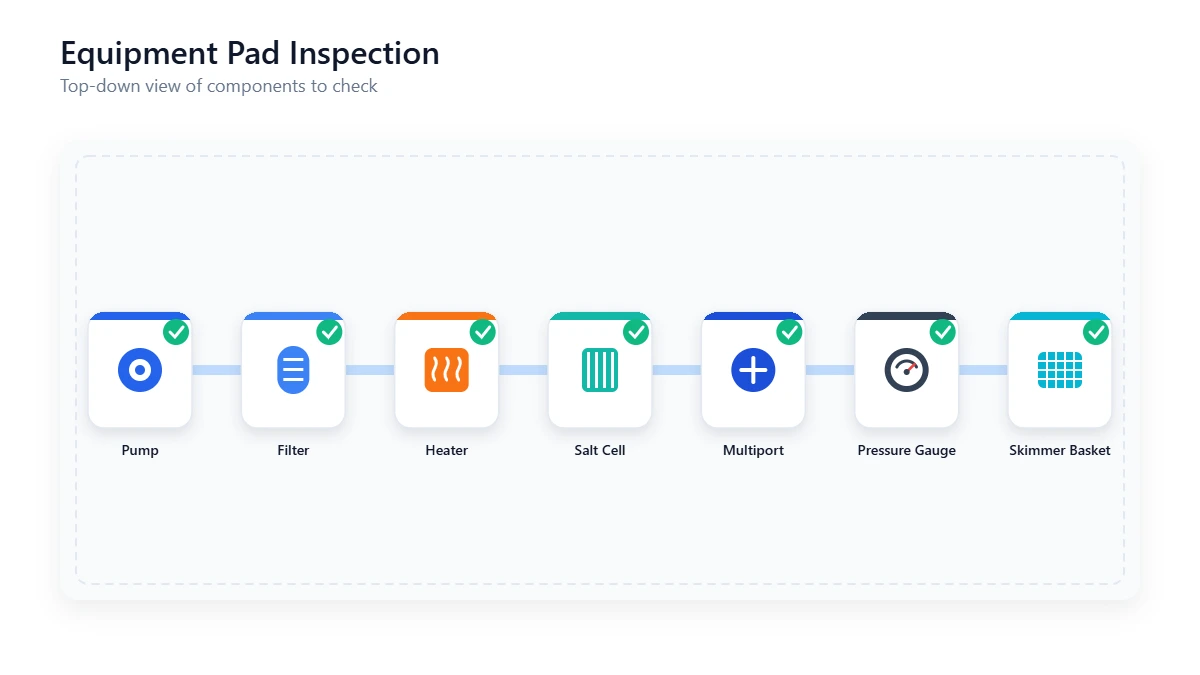
Step 2: Inspect Equipment for Winter Damage
Winter weather causes freeze-thaw cycles that can crack pump housings, corrode fittings, and damage filter components. A 10-minute inspection now prevents a $1,000+ replacement later.
The Equipment Checklist
Pump Housing
Look for visible cracks or corrosion on the pump housing. Check all threaded fittings for frost cracks (hairline fractures that weep slightly). If drain plugs were left in the pump housing for winter, remove them now. Listen for unusual grinding or rattling when you prime it.
Small hairline cracks can be sealed with epoxy putty temporarily, but a new pump may be necessary for larger damage.
Filter System
Inspect the filter tank for cracks or corrosion. Check the multiport valve (or sand filter top) for proper operation. Backwash briefly to clear winter debris. If you have a cartridge filter, inspect the cartridge element for tears or permanent deformation. See our complete pool filter guide for detailed maintenance.
If your filter failed to drain and froze solid, it may have internal damage. Test it under pressure before concluding it is ruined.
After inspection, backwash your sand or DE filter, or thoroughly rinse your cartridge filter element before adding any chemicals. A winter-dirty filter cannot properly circulate treated water, and starting with a clean filter ensures your opening chemicals distribute evenly.
Heater (if applicable)
Gas heaters are particularly vulnerable to freeze damage. Check the copper heat exchanger for corrosion or leaks. Listen for clicking or valve issues when you attempt startup. Electric heater elements should be tested under load.
If your heater was not winterized and experienced freezing, have a professional diagnose it before running it on your new pool water.
Salt Water Chlorinator (if applicable)
Check the cell housing for visible corrosion or cracks. Verify that the power supply is still functioning. Many SWG systems have a 5-10 year cell lifespan; if your cell is older, plan for potential replacement this season.
DO NOT Fill Your Pool Yet
If you discover equipment damage, fill the pool after repairs are complete. Water damage to a defective pump or filter can void warranties and make repairs more expensive. Use our equipment troubleshooter to diagnose common issues.
Found Equipment Damage?
Cracked pipes, leaking seals, and motor issues are best handled by a licensed pool technician.
Step 3: Reconnect and Prime the Pump
Many pool owners fail to prime their pump correctly, which causes air locks, cavitation, and pump damage. This step requires patience and precision.
Step-by-Step Reconnection
Remove Winterizing Plugs & Flush Antifreeze
Before reconnecting equipment, remove all winterizing expansion plugs from return lines and the skimmer. If pool antifreeze was added during closing, flush each line with a garden hose to clear the antifreeze before priming the pump. Antifreeze left in the lines will get pumped into the pool and can interfere with water chemistry and chlorine effectiveness.
Reinstall Drain Plugs & Fittings
Reinstall all threaded drain plugs that were removed for winterization. Replace any worn or cracked O-rings and apply silicone-based pool lube (such as Magic Lube or Jack's Lube) to all O-rings before reassembly. Do not use thread seal tape (Teflon tape) on pool fittings — pool connections are designed to seal with O-rings, and tape can shred into the impeller or cause cross-threading. A quality pool lube can protect O-rings for longevity. Tighten them snugly but not excessively (hand-tight plus a quarter turn with a wrench). Over-tightening will crack the housing or strip threads.
Reconnect All Equipment
Reattach the pump discharge line to the filter inlet, heater outlet to filter inlet (if applicable), and main drain/skimmer lines to the pump inlet. Verify all unions are hand-tight, then use one wrench turn to secure. Air leaks anywhere in the suction line prevent priming.
Priming the Pump
The pump is primed when the pump housing and suction line are completely filled with water (no air pockets). Follow this sequence:
- Close all ball valves except those feeding the pump (typically the skimmer and main drain should be OPEN).
- Fill the pump basket housing with water using a submersible pump or bucket. This is the priming step — fill it until water overflows slightly.
- Replace the pump basket cover and tighten by hand (do not over-tighten).
- Turn on the pump. Water should flow out of the return jets within 5-10 seconds. If you hear grinding or cavitation (loud rattling), shut it off immediately.
- If the pump doesn't prime after 30 seconds, turn it off, refill the basket housing, and try again. Repeat up to 3 times.
- If it still won't prime, you have an air leak in the suction line. Check all unions and fittings for loose connections.
Pro Tip
Run the pump for 15-30 minutes and watch for water leaks around all fittings and the pump housing. Small leaks will worsen over the season. If you spot a leak, turn off the pump and tighten that connection slightly, then test again.
Step 4: Clean the Pool
Winter leaves leaves, pine needles, algae film, and silt on your pool surfaces. Skipping this step means your chemicals spend energy fighting organic debris instead of maintaining clear water.
The Deep Clean Sequence
- Skim the Surface: Use a leaf net to remove floating debris. Do multiple passes if necessary.
- Brush the Walls & Floor: Use vigorous circular motions to scrub algae film and loosened debris. A quality pool brush makes this significantly easier — brush every wall, the floor, and steps. This is where most of the effort goes. See our algae prevention guide for proper brushing technique.
- Vacuum the Floor: Start at the deep end and work toward the shallow end in overlapping rows. If debris is heavy, vacuum on the "Waste" setting to bypass the filter entirely.
- Clean Tile Line: Use a tile brush and pumice stone or mild acid (diluted muriatic acid, 1:10 ratio) to remove waterline stains. Rinse thoroughly after.
- Empty Baskets: Clean your pump basket and skimmer baskets. Leaves and debris will clog your filter fast.
Time estimate: 45 minutes to 1 hour for most residential pools (15,000-25,000 gallons).
Step 5: Fill to Proper Water Level
An incorrect water level disrupts pump suction, decreases filter efficiency, and can leave you unable to skim debris or vacuum properly.
The Correct Fill Level
Fill your pool until the water level reaches the mid-point of the skimmer opening. This is typically 1-2 feet below the coping (top edge) on most residential pools. The water should be exactly at the center of the skimmer slot, not above or below.
Many pools lose water during winter from evaporation and minor leaks, so you may need to add significantly more water than you expect.
Chlorine & Fill Water
If you are adding well water or city water with chlorine already in it, your opening chemicals may interact unexpectedly. If your tap water has chlorine, allow it to gas off by running the pump for a few hours before testing and balancing. If your water has high metals (well water), consider adding a Metal Sequestrant after opening chemicals to prevent staining. See our water loss guide to understand if you're losing water to leaks.
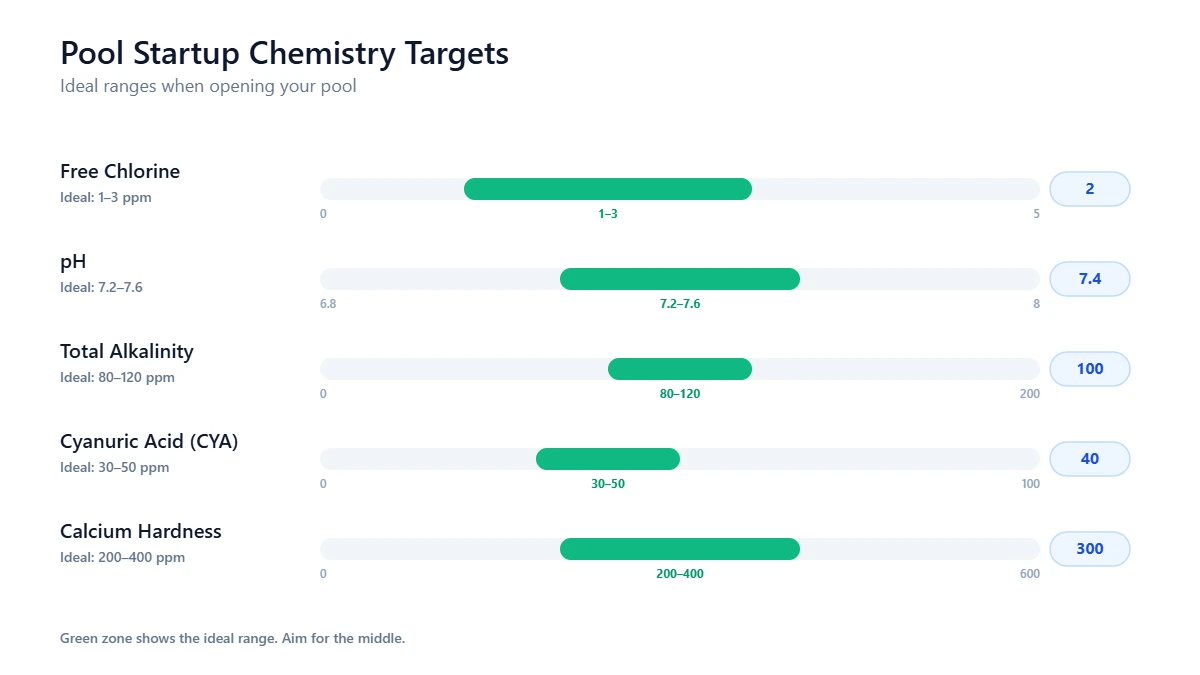
Step 6: Test and Balance Water Chemistry
This is the most critical step. Many pool owners skip testing or add chemicals in the wrong order, resulting in weeks of murky water and wasted money on chemicals. The order matters.
The Proper Chemical Startup Sequence
Test your water FIRST using a Taylor K-2006 drop test kit or digital tester. Then follow this exact sequence:
Alkalinity First (80-120 ppm)
Alkalinity is your water's ability to resist pH changes. If it is too low, your pH will swing wildly. If it is too high, your pH becomes nearly impossible to lower. Target: 80-120 ppm.
To raise: Add Alkalinity Increaser (Sodium Bicarbonate) at 1.5 lbs per 10,000 gallons to raise 10 ppm.
To lower: Use pH Down (Muriatic Acid). Add slowly — lowering is easier than raising. Typical dose: 1 qt per 10,000 gallons lowers alkalinity ~10 ppm. Always add acid to water, never water to acid.
pH Second (7.2-7.6 ppm)
pH tells you how acidic or basic the water is. Your goal is 7.2-7.6 (slightly basic). At this pH, chlorine is most efficient, and water feels comfortable on eyes and skin.
To raise pH: Add pH Increaser (Soda Ash). Typical dose: 0.8 lbs per 10,000 gallons raises pH ~0.2.
To lower pH: Add Muriatic Acid. Typical dose: 1 qt per 10,000 gallons lowers pH ~0.2. Always add acid to water.
Calcium Hardness Third (200-400 ppm)
Calcium is dissolved minerals in your water. Too little, and water becomes corrosive (eats plaster and metal). Too much, and it causes cloudy water and scaling. Target: 200-400 ppm (most systems prefer 300 ppm).
To raise: Add Calcium Chloride. Typical dose: 1.5 lbs per 10,000 gallons raises hardness ~10 ppm.
Note: If you are using well water, test it first. Well water often has very high calcium already. Tap water typically has 50-200 ppm. You may not need to add any.
Cyanuric Acid (CYA) Fourth (30-50 ppm)
CYA is a chlorine stabilizer that protects chlorine from UV breakdown. Without it, your chlorine gas off in the sun within hours. New pools need initial CYA.
Typical dose: 2-3 lbs per 10,000 gallons for initial opening. Each pound raises CYA ~3 ppm. Target opening level: 30-50 ppm.
Warning: Too much CYA locks up your chlorine (chlorine lock). Once you add CYA, you cannot remove it without draining part of the pool. Go conservative — you can always add more later.
Your Pool Details
Don't know? Use our calculator
Step 7: Shock the Pool
Shocking destroys bacteria, algae spores, and organic contaminants that accumulated over winter. This is not optional, even if the water looks clear. Dormant bacteria and algae are invisible until they bloom.
Shock Dosage by Condition
The amount of shock you need depends on what you see when you pull the cover off. Use calcium hypochlorite (cal-hypo) shock for opening, not dichlor or trichlor, as those add CYA which you may not want at opening.
Shock Procedure
Always shock at dusk or after sunset. UV light destroys chlorine rapidly, so daytime shocking wastes up to 50% of your product. Pre-dissolve granular shock in a bucket of pool water (never the reverse) and pour slowly around the perimeter with the pump running. Run the pump continuously for 24 hours after shocking. Do not swim until free chlorine drops below 5 ppm, which typically takes 24-48 hours. Test the next morning to confirm chlorine is holding. If it drops to zero overnight, your pool has high chlorine demand and needs a second shock treatment. For green pools, see our complete guide to shocking a green pool.
Safety Reminder
Never mix different types of shock products. Never add shock directly to the skimmer. Always add shock to water, never water to shock. Wear gloves and eye protection. Store chemicals in a cool, dry place away from direct sunlight. Review our chemical safety guide before handling pool chemicals.
Step 8: Monitor the First Week
The first week after opening is critical. Your pool chemistry is still stabilizing, and problems caught early are cheap to fix. Problems ignored for a week can spiral into algae blooms, cloudy water, and equipment issues that cost real money.
Daily Checklist (Days 1-7)
By day 7, your water should be crystal clear with stable chemistry. If it is still cloudy, use a clarifier or flocculant. If chlorine still will not hold, test your CYA level and consider whether you have a chlorine lock situation. Use our water analyzer on our homepage to diagnose any remaining chemistry issues.
Common Opening Mistakes
These mistakes waste chemicals, damage equipment, and delay your first swim. Every one is avoidable.
Adding chemicals before testing
Never dump chemicals in blind. Your winter water might already have high alkalinity from the cover or high calcium from well water top-off. Test first, then dose based on actual readings.
Adding chemicals in the wrong order
Alkalinity must come before pH, and both must come before chlorine. Each chemical affects the next. Adding chlorine first when pH is wrong wastes most of its sanitizing power.
Shocking during the day
UV light destroys unstabilized chlorine within hours. Shocking at noon means half your product is gone before it can work. Always shock at dusk and run the pump overnight.
Not running the pump long enough
Your pool needs at least one full water turnover (typically 8-12 hours) to circulate chemicals evenly. Run 24 hours for the first 3 days, then drop to your normal schedule.
Ignoring the filter after shocking
Shock kills algae and bacteria, but those dead organisms clog your filter. If you do not clean the filter within 2-3 days of shocking, flow rate drops and water turns cloudy again.
Frequently Asked Questions
When should I open my pool?
How long does it take to open a pool?
How much does it cost to open a pool?
My pool is green after winter. What do I do?
Do I need a professional to open my pool?
First Time Opening Your Pool?
A Pro Can Get You Swimming in One Visit.
Spring openings involve plumbing, electrical connections, and chemical balancing that can feel overwhelming the first time. A local professional can open your pool, inspect all equipment, and hand you crystal-clear water — typically for $150-$300.
Related: How to Test Pool Water · Winterization Guide